


So you just got your new Synology network-attached storage (NAS) device and uploaded terabytes of data on it. That’s great, but how do you secure it? The truth is, NAS devices are very interesting targets for hackers because they store sensitive information and are not always secured. Every brand has had its fair share of issues from ransomware attacks to virus infections. These attacks typically do not happen because of some software or hardware issue, but rather due to the owner’s inability to adopt appropriate security precautions. No single measure will guarantee complete security, but taking these steps will probably help you prevent 99% of potential attacks.
Step 1: Change default settings
Change default ports
Every Synology uses the same HTTP (5000) and HTTPS (5001) ports by default. This makes it very easy for an attacker to figure out where your DSM is hosted. Change these ports to any other number (e.g., 9876 / 9875) under Control Panel > Network > DSM Settings.

Create new admin account
Many NAS attacks are simple brute-force techniques – attackers try to guess your username and password. You can make it a lot more difficult by disabling the default admin account and creating a new admin account under a different username (e.g., peter_admin). You can do this under Control Panel > User. It is also a recommended practice for admin to have a separate user account for everyday activities. This user account will be able to access files but does not have system admin privileges (in case your credentials get compromised, the attacker won’t be able to lock the whole system).
Set up 2-set verification
It is a good idea to have 2FA enabled for all of your online accounts and it is definitely a good idea to have this enabled for your NAS. If attackers somehow guess or steal your password, they would still need the 6-digit OTP code (typically stored in some mobile app) to get access to your NAS. You can do this under Options (silhouette icon in the top right corner) > Personal > Enable 2-step verification. Currently, OTP is the only option in DSM 6, but this area is getting a lot of attention and improvements in the upcoming release of DSM 7.
Disable QuickConnect
QuickConnect is a smart function that makes your Synology NAS reachable using a simple QuickConnect ID. While it might increase convenience for you, I would strongly recommend against using this setting, because it also makes it easier for attackers (e.g., simply by guessing your QuickConnect ID). In my opinion, DDNS provides similar functionality with a lot less security risk. You can disable QuickConnect under Control Panel > QuickConnect.

Enable auto-block and account protection
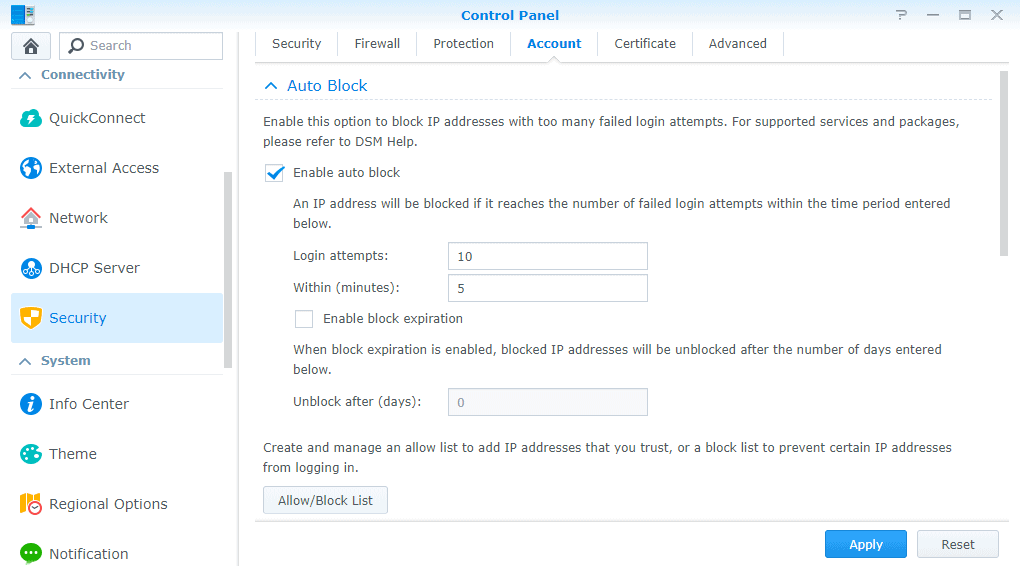
Finally, enable two additional security features that will significantly lower the chances of any brute-force attack. Both settings are available under Control Panel > Security > Account. Auto-block allows you to blacklist any IP address that reaches a certain number of failed logins. Similarly, account protection can lock accounts for a specified time due to failed logins.
Step 2: Configure your network
Disable port forwarding
Some guides will tell you to go to your network router and forward DSM ports as well as ports 80 / 443 to your Synology NAS. Unless you know what you are doing and have appropriate firewall rules set up, don’t do it. Opening up ports makes it easier to attack your NAS just by knowing your IP address. If you disable port forwarding, your experience on the local network won’t be impacted and traffic from the external network won’t get past your router.
If you need to access your Synology NAS remotely, consider setting up either a VPN or reverse proxy with a strong firewall. For more information, see our tutorial:

Use HTTPS encryption
It is always a good idea to use HTTPS when accessing your NAS. You will need to change the default setting under Control Panel > Network > DSM Settings (tick the box Automatically redirect HTTP connections to HTTPS). From now on, DSM will default to your HTTPS port configured under step 1.
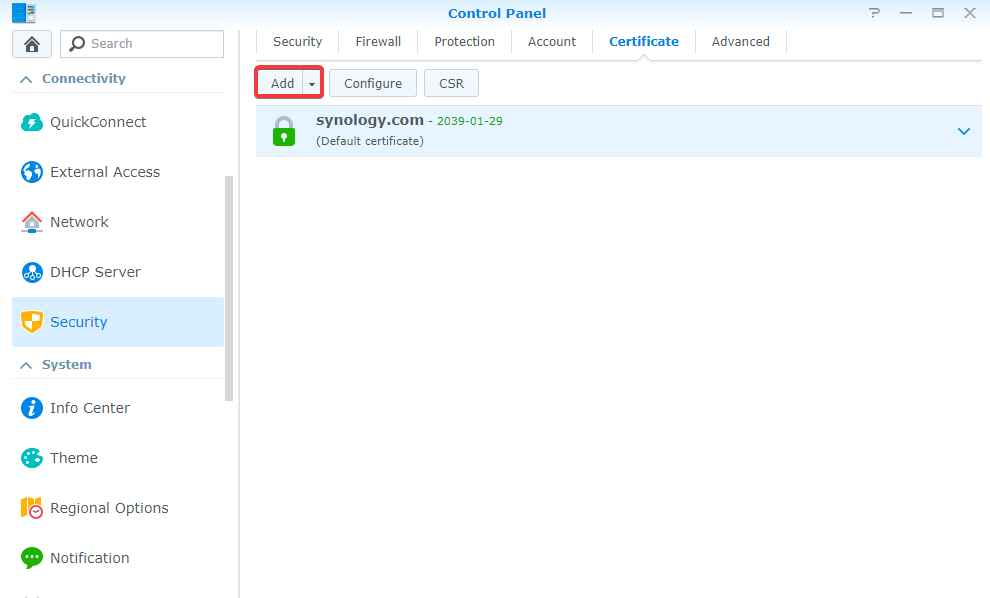
Next, you will need to create a free SSL certificate. DSM has built-in support for Let’s Encrypt which is a widely accepted free SSL service. Go to Control Panel > Security > Certificate and select Add a new certificate > Get a certificate from Let’s Encrypt. For this to work, you will have to enter your Synology DDNS address and forward (at least temporarily) ports 80/443 to Synology IP. Let’s Encrypt will verify the address and immediately issue a certificate with 3-month validity.
Step 3: Backup important data
Enable regular Hyper Backup
Hyper Backup is a very useful package for replication of your Synology NAS data. You can backup individual files, applications, and system settings into a number of different backup destinations. I would highly recommend using an off-site backup into another Synology NAS or a cloud provider. In terms of cloud storage, you can go with Synology’s in-house service (Synology C2) or choose another third-party storage provider. Backblaze B2 (using S3 compatible protocol) is another popular and cost-effective option for Synology NAS owners.
Schedule Snapshots
For newer machines using Btrfs file system, Synology provides a package called Snapshot Replication. Think of snapshots as very frequent backups (e.g., every hour) that take a fraction of space used by traditional backups. This can be very helpful if you need to restore your system to a point before the attacker made changes to your files.
Step 4: Install Synology security packages
Finally, Synology DSM 6 has a number of additional packages that will help you make your NAS secure. I would highly recommend installing the following two:
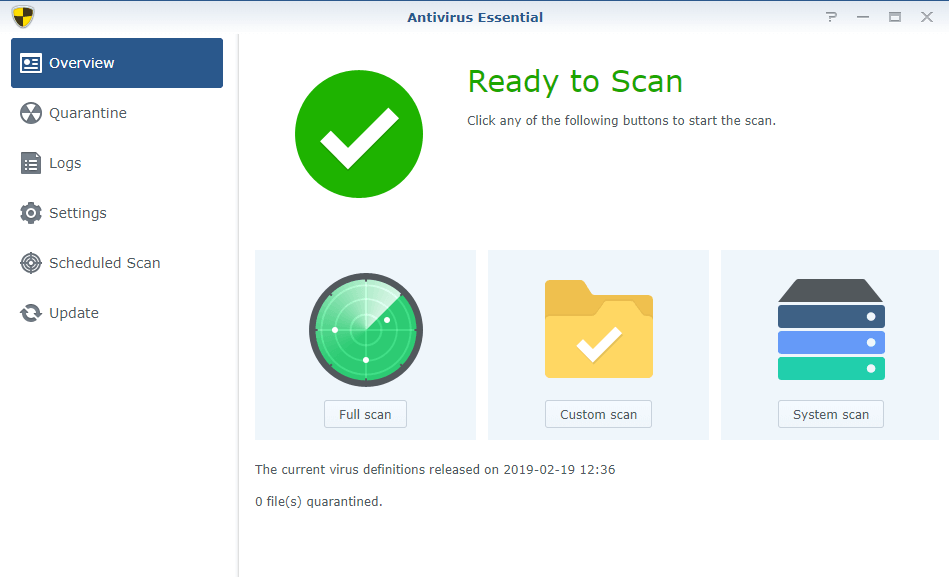
- Antivirus Essential – Basic free antivirus software that will automatically scan for known viruses in your system. Make sure to enable at least weekly scheduled scans.
- Security Advisor – This core DSM app scans your system configuration and offers suggestions based on your use case (i.e., household NAS vs. enterprise NAS) and known attack strategies. Again, it is a good idea to set a regular scanning schedule and an email notification if new issues are discovered.