


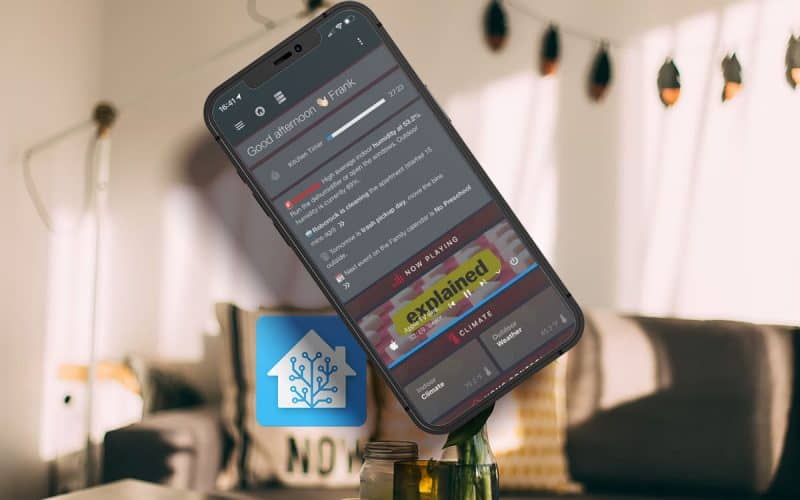
Greeting
BREAKING CHANGE IN HOME ASSISTANT 2022.7
This code will no longer work in the latest Home Assistant version. Instead of using the surrogate pair to display emojis (e.g., {{‘\uD83D\uDE34’}}) as described below, you can paste the emoji symbol directly into your text / code (e.g., 👉)

This is a simple Markdown card with an underlying sensor.
content: '{{ states(''sensor.greeting'') }} {{user}} '
style: |
  ha-card {
    font-family: helvetica neue, helvetica, Arial;
    color: 'rgba(255, 255, 255, 0.7)';
    font-size: 25px;
    font-weight: 300;
    letter-spacing: '-0.05vw';
  }
theme: dark
type: markdown
The sensor was adapted from matt8707’s configuration:
template:
  - sensor:
      - name: Greeting
        icon: mdi:hand-wave
        state: >-
           {% set t = now().hour %}
           {% if t <= 1 %} Good night {{'\uD83D\uDE34'}}
           {% elif t <= 3 %} Good night {{'\uD83D\uDE34'}}
           {% elif t <= 5 %} Good night {{'\uD83D\uDE34'}}
           {% elif t <= 7 %} Good morning {{'\uD83C\uDF73'}}
           {% elif t <= 9 %} Good morning {{'\uD83C\uDF73'}}
           {% elif t <= 11 %} Good morning {{'\uD83C\uDF73'}}
           {% elif t <= 13 %} Good afternoon {{'\U0001F60A'}}
           {% elif t <= 15 %} Good afternoon {{'\U0001F60E'}}
           {% elif t <= 17 %} Good afternoon {{'\U0001F44B\U0001F3FB'}}
           {% elif t <= 19 %} Good evening {{'\U0001F44B\U0001F3FB'}}
           {% elif t <= 22 %} Good evening {{'\U0001F60C'}}
           {% elif t <= 23 %} Good evening {{'\U0001F974'}}
           {% else %} Good evening {{'\U0001F974'}}
           {% endif %}
Timer card

This card is only active when I have a timer active on my Google Home Mini device. For a detailed tutorial, please refer to this article:

This is the card setup:
type: conditional
conditions:
  - entity: sensor.kitchen_timer
    state: active
card:
  entities:
    - sensor.kitchen_timer
  type: custom:timer-bar-card
  theme: dark
Status dashboard
My status card displays important information based on a few lines of YAML and HTML code. The underlying card type is a simple Markdown card:
content: >-

MESSAGE 1
MESSAGE 2
MESSAGE 3

style: |
  ha-card {
    font-family: helvetica neue, helvetica, Arial;
    color: 'rgba(255, 255, 255, 0.7)';
    font-size: 14px;
    font-weight: 400;
    letter-spacing: '-0.05vw';
  }
theme: dark
type: markdown
Now let’s look at some examples of these messages:
ALERT – HIGH HUMIDITY
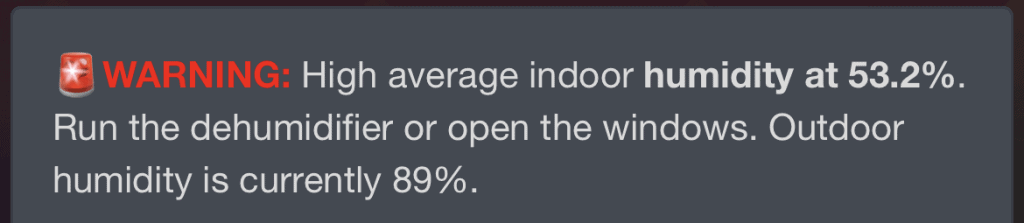
  {% if states('sensor.indoor_humidity')|float > 50 %}  {{
  "\uD83D\uDEA8" }}WARNING: High average indoor
  humidity at {{ states('sensor.indoor_humidity') }}%. Run the
  dehumidifier or open the windows. Outdoor humidity is currently {{
  state_attr('weather.home','humidity') }}%. {% else %} {% endif %}
ALERT – car gas level
 {% if states('sensor.car_tank_level') == 'unavailable' %} {% elif
  states('sensor.car_tank_level')|float < 15 %}  {{ "\uD83D\uDEA8"
  }}WARNING: Your car is running out of gas,
  current gas tank level is {{ states('sensor.car_tank_level') }}% ({{
  states('sensor.car_range') }} miles range) {% else %} {% endif %}
Vacuum status

  {% if 'cleaning' in states('vacuum.roborock') %} {{ "\uD83E\uDD16"
  }}Roborock is cleaning the apartment (started {{
  (states('sensor.roborock_last_clean_duration')|float / 60)|round(0) }} mins
  ago)  {% else %} {% endif %}
SHOPPING LIST
{% if states('sensor.shopping_list')|float > 1 %} {{ "\uD83D\uDED2" }}
There are {{ states('sensor.shopping_list') }} items on the shopping
list
{{ "\uD83D\uDED2" }} There is
{{ states('sensor.shopping_list') }} item on the shopping list
time sensitive message

  {% if (now().weekday() in (2,) and now().hour > 16) %}  {{ "\uD83D\uDDD1"
  }} Tomorrow is trash pickup day, move the bins outside. {% else %}
  {% endif %}
CALENDAR

  {{ "\uD83D\uDCC6" }} Next event on the Family calendar is
  {{state_attr('calendar.family', 'message')}}
HOME ASSISTANT UPDATE
  {% if states('sensor.current_version') == states('sensor.latest_version') %}
  {% else %} {{ "\uD83C\uDD95" }} Home Assistant update available (latest
  version is {{states('sensor.latest_version')}})  {% endif %}
Now playing

Finally, this conditional card will appear if a specific media_player is active:
card:
  cards:
    - hold_action:
        action: none
      image: /local/headers/now_playing.png
      tap_action:
        action: none
      type: picture
    - artwork: cover
      hide:
        volume: true
      idle_view:
        when_idle: true
        when_paused: true
      style: |
        ha-card {
            height: 120px
        }
      type: custom:mini-media-player
      entity: media_player.apple_tv_living_room
  type: vertical-stack
conditions:
  - entity: media_player.apple_tv_living_room
    state: playing
type: conditional
Styling and other tips
I am also using a few styling elements to make the Home Assistant status dashboard look better (see style: in the markdown code). You can apply these after installing card-mod from the HACS store. You can then apply CSS to almost any Home Assistant card.
For emoji elements (e.g., {{‘\uD83D\uDE34’}}), please refer to my tutorial Using emoji in Home Assistant.
My theme in this configuration is the Clear Dark Theme.